Showing posts with label crochet. Show all posts

Friday, November 15, 2013

Weekend Crochet

I recently published the pattern for my Hooded Scarf or Cowl, using Lion Brand Homespun yarn. This design incorporates the rounded hood technique that I used in the Wildwood Capelet and works quite well in Homespun for a soft and warm hood. You can add a scarf to wrap around or tie in the front or add a circular cowl that can be looped around for warmth. This pattern calls for 2 skeins of Homespun, but only uses a small amount of the second skein. I decided to share with you an easy pattern to use up part of the remaining yarn.

These Homespun Fingerless Mitts are sized to fit ladies or teens, but once you've made a pair you can easily adjust the starting chain to fit the hands of a man or even a child. Just use as many stitches as fit comfortably around the knuckles or base of the fingers and follow the pattern from there, adjusting for the different stitch count. The Foundationless Double Crochet stitch works great for the fingertips of these because it creates a nice, stretchy edge. There's a link for that tutorial HERE.
When crocheting with Lion Brand Homespun yarn, the best advice is not to work too tightly. The yarn calls for a K hook, and most of the time I do use a K hook with Homespun. However, when working with a smaller hook (such as a J hook, as called for in this pattern), you don't want your work too loose either. The reason for using a smaller hook is for a slightly tighter fabric. The more you work with Homespun, the easier it gets. I've read reviews from people who don't like working with it because it gets caught on the hook. I've learned to keep my stitches relatively loose and, at the same time, if it does get caught on the hook I can back step just a bit to drop the bit that doesn't belong off the hook. You'll be able to tell which is the working loop and drop the tighter, incorrect piece off the hook. If you continue and force the next stitch it tends to become tight and difficult to manage and can affect the overall look of your finished fabric. The best thing to do is to go back and fix the loop so that you're sure it's only the working loop on the hook. At any point, you can also drop the loop off the hook, pull it free from the catch and continue on from there. Knitting with Homespun sometimes requires a similar approach, dropping the extra "catch" off the needle as necessary to prevent a tight and inconsistent stitch.
Overall, Lion Brand Homespun continues to be one of my favorite commercial yarns. It makes wonderful shawls, hats, mittens and more, whether knit or crochet. These patterns are easy and should make for a fun weekend of crochet!
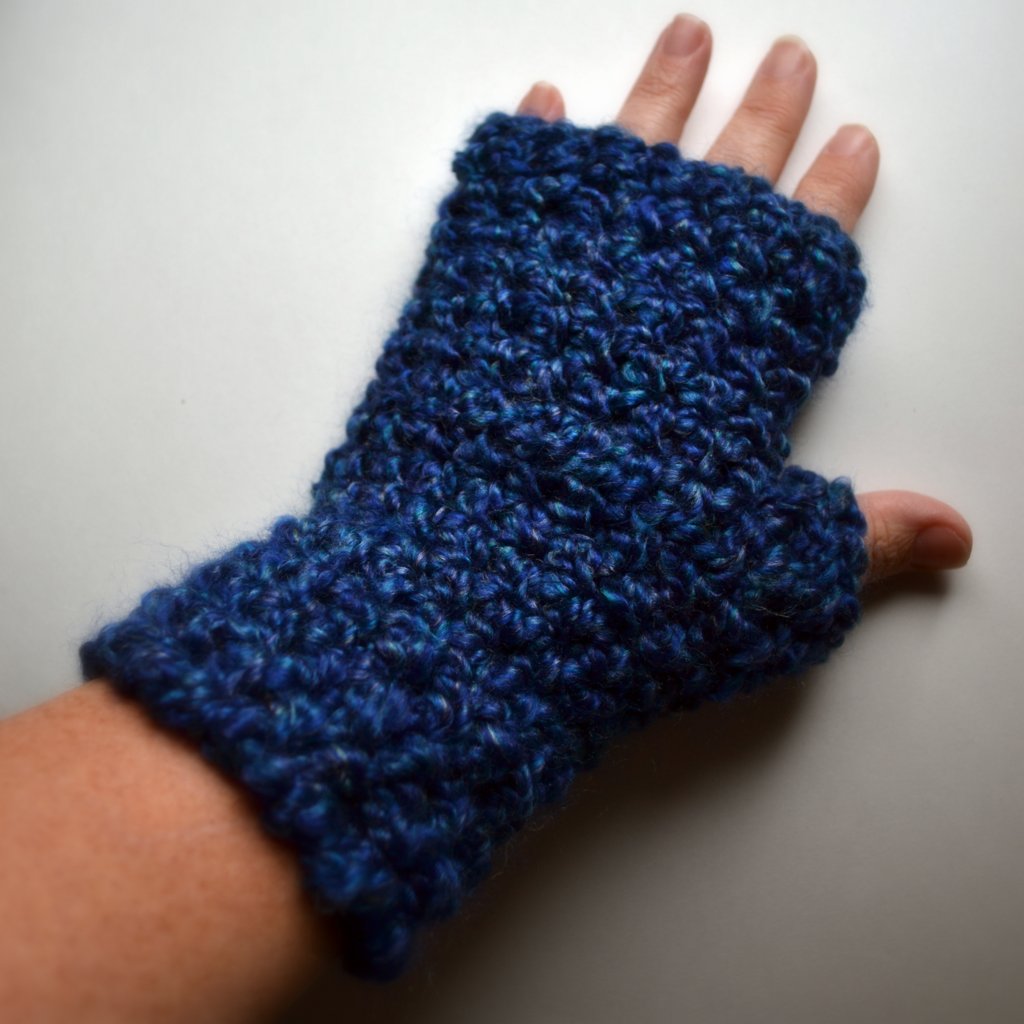

Homespun Fingerless Mitts
by LazyTcrochet
© 2013 LazyTcrochet


Lion Brand Homespun (less than one skein)
J hook (6 mm)


Stitches used:
hdc = half double crochet
DcCh = double crochet chain or “foundationless double crochet” (instructions and tips can be found on my blog at http://lazytcrochet.blogspot.com/2010/03/foundationless-crochet.html )
Reverse sc = Reverse single crochet (sc in the next stitch to the right instead of working to the left as usual)


Round 1:  Starting at the fingertip end, leaving approximately 6" tail, DcCh 17, join to bottom of first DcCh. (beginning ch 3 counts as first DcCh) (17 DcCh)
**If you don’t wish to try the DcCh or foundationless double crochet, you can start by chaining 18, double crochet in the 3rd chain from the hook and in each across. Join to top of beginning chain.**
Round 2: Ch 2 hdc in next st. and each st. around. Join to top of ch 2. (ch 2 counts as hdc throughout) (17 hdc)
Rounds 3 - 5:  Repeat round 2, join. (17 hdc ea. round)
Row 6:  Ch 2, hdc in next st. and each st. around. (17 hdc) Do not join.
Row 7:  Ch 2, turn. Hdc in same (creates an increase) and ea. st. around, working the last st. loosely (18 hdc).
Row 8:  Ch 2, turn. Hdc in same (creates an increase) and ea. st. around, working the last st. loosely (19 hdc). Join to top of ch 2. Do not turn.
Round 9:  Ch 2, hdc in next st. and each st. around. Join to top of ch 2. (19 hdc)
Rounds 10 - 15: Repeat Round 9 (19 hdc ea. round).
Round 16:  Ch 1, working loosely, work in reverse sc for one round and join. (This step isn’t necessary, but creates a nice edging and it helps distinguish between the wrist end of the gloves and the fingertip end.)
(If you want a longer glove, continue working in the round until you reach the desired length. You can increase a stitch, if necessary, to fit your arm. Then work the last round in reverse sc to finish the edge.)
Fasten off and start the thumb.


Join yarn in the thumb hole opening.
Ch 2 and work 9 hdc evenly around the opening. Join to top of ch 2. (10 hdc)
Ch 2, hdc in next st. and each st. around. Join to top of ch 2. (10 hdc)
Fasten off.


Use the yarn tail at the fingertip and a yarn needle to sew closed the gap created by the DcCh then work all the ends in.
© 2013 LazyTcrochet
For personal use only.

Friday, September 20, 2013

Along Came A Spider

You can see the real spider's web on the outside of the window!


I haven't officially decorated for Halloween yet. I was about to wash the windows, like I do every Fall, and noticed a spider web on the outside. It reminded me of a picture I saw of a crocheted spider's web and thought I'd try it.
I don't particularly care for thread crochet as I'm more of a chunky girl myself. I thought of trying it free form, but since I'm not used to doilies or working with thread, I decided to search for a pattern to get me started. Once the center was started, it was easier to change it up and free form the outside. (Having an asymmetrical center might be better next time.) I added a piece of Ric-Rac that reminded me of the Orb Spiders that we have in the vegetable garden.
This pattern from Crochet 'N' More is for a Spiderweb Table Topper and calls for a sport weight yarn. I used Aunt Lydia's crochet thread size 3 and a D (3.25 mm) hook, following the instructions through round 4 or 5 and then improvised. You could make it as large or small as you like.
I pinned mine to a window corner, but you could make it large with worsted yarn, tie it to a fence or a door, and add a really big spider if you want. I will add a tiny spider to mine once I get the decorations out. 'Tis the season!


Friday, June 21, 2013

Button Tips and Techniques for Knit or Crochet

I love buttons and have been incorporating them into my designs as often as I can. Whether functional or decorative, you want to make sure they're going to stay in place and, if necessary, stand up through washing and ordinary wear. I've put together some tips and techniques for sewing buttons on knit and crochet pieces.

I love chunky and bulky yarns and they provide a fabric with which you can use some bold and beautiful, large buttons.

With some yarns, you can adjust the gauge of crochet stitches, or use longer stitches to accommodate the size of the buttons and just button anywhere in the stitches, without having to create an exact button hole. For example, with Wool Ease Thick & Quick yarn, a size P crochet hook, and a double crochet stitch pattern, a 2" button will fit nicely between the stitches. For an extra large button, a triple stitch might fit better. Test your stitch size with what buttons you want to use, but it's best not to use too small of a button if you use this method. You don't want it slipping off all the time. Also, smaller and 4-ply yarns might split and get caught on the buttons, that's why I tend to do this only with the thicker, bulkier yarns.


 If you can, plan on using the tail of the yarn to sew on the button. If the tail yarn is near where you want the button to be, the holes of the button are large enough for the yarn and needle, and the yarn is appropriate for sewing on a button, just weave it through a few stitches and sew the button. Knot the yarn and weave in the ends.  You'll need a longer yarn tail if you choose to do it that way. Most types of yarn would be appropriate for sewing with, but be careful if you're using single ply wool or loosely spun fibers since you can't pull snugly, they might pull apart.  I do this a lot with some of my button wraps. The corner button uses the yarn tail, but I'll sew with an additional piece of yarn when adding a second button in another location.

I highly recommend having a sewing kit on-hand. Often times, you'll need a particular color of thread to sew on a button on knit or crochet fabrics. Instead of buying a whole spool of thread in a color you may not need again, you could probably find a close enough color in a sewing kit.


If you're using sewing thread to sew on a button, it's best to double the thread and knot it. If you only knot one end of the thread, leaving a loose tail, that knot might slip through the yarn strands and not be a secure start to sewing on the button. It might work for some fabrics, but not when working with yarn.  I like to start by working the needle with knotted double thread around the yarn, pull the needle through the doubled thread and pull tightly. This makes a nice foundation to start sewing on the button
One last tip, in regard to button holes, is to whip stitch on the side of the button hole. As you can see here, a button hole was created by skipping a stitch. That skipped stitch might be loose enough to catch on a button, so I like to whip stitch a few stitches over it to tighten it up and create a more prominent button hole.  If you happen to have a yarn tail to weave in near the button hole, whip stitch around a loose stitch if desired.


For more button tips see this great post at Crochet Me.

Friday, October 5, 2012

Wildwood Capelet - New Crochet pattern and tutorial


The new Wildwood Capelet is a shawl-style capelet with a rounded hood in soft and chunky crochet. The hood has a rounded design and utilizes a special technique that is described below.

© 2012 LazyTcrochet

I'm including this video tutorial to demonstrate my version of a flat braid join in crochet. It's a technique that is often used to join granny squares, but I have interpreted it here for the purpose of joining the back of the hood for my Wildwood Capelet pattern. (Not a professional video, but I think it clearly demonstrates how to create the stitch while joining.)
This hood pattern also utilizes the DcCh (Double Crochet Chain) or Foundationless Double Crochet as described in an earlier post http://lazytcrochet.blogspot.com/2013/06/foundationless-double-crochet-tutorial.html


The pattern for the Wildwood Capelet is available on Craftsy and Ravelry. © 2012 LazyTcrochet 


Tuesday, October 18, 2011

Crochet Pattern Granny Square Circle Shrug

The pattern is now available for this shrug. It's crocheted out of Cascade Eco Wool and is a snuggly one-size-fits-all kind of shoulder warmer shrug. Not your typical granny square. Visit the pattern page here...
http://www.etsy.com/listing/84058713/crochet-pattern-granny-square-circle and the finished sweater is available in the same Ecru color as in the photo here... http://www.etsy.com/listing/83310800/ecru-wool-shrug-crochet-circle-sweater


Click HERE for all available patterns.

Thursday, August 25, 2011

Circles

Circles seem to be all the rage. I've come up with a pattern for my circle vest shrug since so many people have asked for it. Some designs start with a circle at the back and continue all the way around the collar. This one has a distinct square back to it, with an added circular collar around. You can add a button or use a shawl pin. I have both the pattern and finished designs available at LazyTcrochet.Etsy.com.
Here's one in Paprika, with a wooden button...

And Black, with a wooden shawl pin...


The pattern is available in my Etsy shop here. See my post on Foundationless Crochet for tips!

Tuesday, July 12, 2011

Felting Time


While Granny Squares are not my favorite thing to crochet, I am excited about felting them into a groovy handbag. It's been a long time since I've felted (or fulled) anything fun. Hats are my favorite thing to felt, but I'll be making mittens, purses, slippers, and more. I think I'll get an electric tea kettle to use down stairs. My water is hot, but it doesn't stay hot enough and I like to add a kettle of hot water to it as it cools down. I was making myself nervous carrying a kettle of boiling water down the stairs.

Crocheting or knitting something and then felting it in hot water is my favorite form of felting.
Wet-felting is fun, but I tend to make a huge mess! Needlefelting is something I'd like to do more of. I've never been "artistic" in the drawing or painting sense, but needle felting seemed to coax the creativity right out of me. It flowed so easily as I painted with the wool. So, I'll be working with some raw and colorful fibers very soon!

Thursday, June 10, 2010

Clan Buchanan Complete


I can't believe that it's been 2 1/2 years since I started this project. I blogged about this afghan that I had started for my aunt and uncle. (January 2008!) It's crocheted and then woven for the plaid effect. I zipped through the crochet part and then hit my busy season and weaving the chains seemed to take forever. Well, Mom finally took the project home with her and finished it in no time. She gave it to my aunt and uncle months ago, but I never got to see it...until now. It turned out great! Thanks Mom.

Friday, March 5, 2010

Foundation Double Crochet - FDC


I thought I'd share with you one of my favorite techniques. Instead of starting every project with a chain strip, using a foundation stitch can speed up the start of your project and allow for more stretch than a starting chain would.

A Foundation Double Crochet FDC, or sometimes called DC Chain, is my favorite way to start a simple, lengthwise scarf. It is also good for garments that you crochet from the bottom edge up, since it creates a stretchier edge as compared to a starting chain. It's easy to change a pattern that calls for a starting chain and then a row of DC. Just work a row of FDC instead.
Start with a Ch 3 (this chain 3 counts as your first DC stitch). YO, insert hook into the first Ch, YO and pull through. YO and pull through one loop to create the "base chain" (3 loops remain on hook). Now work a DC as normal - YO and pull through 2 loops, YO and pull through last 2 loops.
See the picture above - the last chain made under the hook is the "base chain" and the double crochet will be on top of it, next to the starting chain 3.
To work the next stitch, YO and insert the hook into what was the last "base chain" stitch (it's actually a ch 1 at the base of each stitch). To make this easier to find, I usually hold that stitch as I'm finishing the DC so I know where the chain stitch is when I move on to the next one.
YO and pull through, creating the next "base chain". (Hold this stitch if you want to to mark it.) Then work the DC - YO, pull through 2 loops. YO, pull through last 2 loops. Continue working FDC for as long as you want your project to be.
So each stitch consists of a base chain (like a ch 1) and finishes with a double crochet, all in one stitch and the beginning chain 3 counts as your first DC.

I have incorporated this stitch in the foundation of my Circle Shrug Vest Pattern, the Long Fingerless Gloves pattern, for the hood on the Wildwood Capelet Pattern, and the Chunky Crochet Button Wrap pattern.


**Update 6/17/13 - I have uploaded a video tutorial for this stitch here and it does include the foundation double crochet, single crochet and half double crochet techniques...  http://youtu.be/UiKLCVd74Mw

Sunday, February 21, 2010

Thinking of you Goldfish Wristlets

I had these fun goldfish bowl buttons and I kept thinking and thinking of what to do with them. Do you daydream of your goldfish? Fun Fingerless Gloves on Etsy

Tuesday, January 12, 2010

Looking Back at Vanna's Choice

I remember when Vanna's Choice yarn was first introduced by Lion Brand Yarn. All those pretty colors were so inspiring for many projects. I'm getting ready to enter the Vanna's Choice Contest. I haven't started on the new project yet, but I sorted through the Vanna stash and found possible yarns to use. Since you can enter as many items as you wish, I took time to look through past designs in search of Vanna's Choice yarn. I made a "Powerpuff" series of hats. The Bubbles Cloche was blue and made out of a different yarn, but Buttercup was green with a buttercup flower. Blossom was a burnt orange with a flower. There are a few other hats, fingerless gloves, and shrugs as well. I put them together here in a collage. When I finish my newest, I'll be sure to show you!
Here's a great design in Vanna's Choice from fellow CreateCrochet team member CrocheTrend.

And look at this sweet hoodie from BallofYarnToo

For more Fiber goodness, stop by Alpaca Farm Girl for Fiber Arts Friday. (Check out the Winter Alpaca Peeps pic!)

Thursday, January 7, 2010

Slipper Story


My son asked if I would make him a pair of slippers. He said he couldn't find the ones that he used to have. I said, well, you're 15 now and I made those for you when you were 7. So, I made him a pair of slippers for Christmas. I didn't finish the second one until a few days after, but he didn't mind. When I presented them to him he had a sad look on his face and said that they're not the same! I felt so bad and asked "what do you mean?" and he said "the other ones had little dots on the bottom". Oh, I remembered then that I used glow-in-the-dark fabric paint to make non-skid dots on the bottom of them. I laughed and, luckily, still had some paint. He loves his pocket watch best.

Sunday, December 7, 2008

Do the Peppermint Twist


I made this pillow a few years ago and it never sold at local shows. I want to make another one now that I'm a little better at what I do. I'll be able to change colors and not have the colors show through. I'll also try to design it so that I can remove the cover to wash it. It was pretty for a first try design and it's now adorning my futon : )

Monday, October 27, 2008

Button, Button, Who's Got the Button?

I do...that's who!
Any chance I get to pick up a cool button, I grab it. I made lots of button scarves last year and intend on making lots more. Some buttons will wait until the perfectly matching yarn or fabric appears. It's great having a wide selection of big buttons to choose from.
Here are two new scarflettes that I'll be adding to my Etsy shop. The blue/green yarn is called Lagoon. It reminds me of the Loch Ness monster, so I added a picot edge and a celtic-style carved bone button. For the soft, creamy homespun, I added these faux bois toggle buttons.

I also finished this wrap over the weekend. It is knit from handspun merino wool in a wonderfully soft Terra Cotta. The buttons are 3" in diameter, handcarved from Argentina. I knew I had to create something special to use those spectacular buttons!
Be on the lookout for more button designs in the LazyTcrochet Boutique!

Monday, September 8, 2008

Glow In The Dark Yarn


When my kids were little I crocheted slippers and used glow-in-the-dark fabric paint dots on the bottom to make them non-skid, or less slippery. It was fun, but at the time I was thinking how cool it would be to have glow-in-the-dark yarn.

Bernat has introduced Glow In The Dark yarns! What a fun embellishment yarn that will be. Of course I instantly think Halloween and spooky crafts. Think of all the other ideas for kids safety - backpacks, hats, mittens, bicycle gear, etc. I may have to make my husband a glow hat for commuting.

With the light pastel colors available from Bernat, handmade glow worm-type dolls will be all the rage!

Bernat's Glow In The Dark yarn is now available at some Michael's, Pat Catan's, or Hobby Lobby Stores. Here's a link to find some in your area... Find Glow In The Dark Yarn.

Thursday, August 14, 2008

Time's A-Wastin'


Summer is on the downhill slope now. There's a chill in the mornings and it's starting to get darker earlier. School will be starting in 10 days or so and it's soccer season for the local soccer club.
Sorting through the leftovers from last school year, my son found all his old papers and notebooks and decided to have a "Ceremonial Burning of the Notebooks." Out with the old and in with the new. He's not looking forward to going back to school. My daughter, on the other hand, has her outfit already picked out and is super-excited.
As for me, I'm looking forward to having my quiet time again. Ever since the kids were little, I've loved having them home with me. I suppose it was a separation issue at first, but, since 9/11, I've just been much more at-ease knowing they're safe at home. It will be nice to have my time alone again so that I can get caught up on some things. I've been putting off scrubbing the carpeting. I need to finish painting the kitchen cabinet doors, and gather more stuff for a huge garage sale.
All that aside, my true love of design and fiber arts has me dreaming of Fall Fashions and jotting down notes as to what I can make with my yarn stash. I'm hoping to get started on some jackets and sweater coats and stock up on scarves, hats, and mittens.
But first...that boy needs a haircut!!

Monday, August 11, 2008

Mobius Huh??


I've been making twisted wraps for awhile now. Once discovering the secret to the continuous twist, I've just made them up as I go, choosing colors and changing the width and edgings. It's a fun accessory because it can be worn so many different ways. Wear a narrow strip as a scarf, wider as a hooded scarf, or even wider to keep your shoulders warm.

Although I've used the term "mobius" for the twisted wraps, I only just looked up the true definition this morning. I think the answer lies with PhysLink.com's Ask the Experts. "What is the Mobius Strip? ...a Mobius strip only has one side and one edge. It was named after Ferdinand Mobius.

Ants would be able to walk on the Mobius strip on a single surface indefinitely since there is no edge in the direction of their movement"

Click on the picture for a link to purchase a poster!

If you'd like to make your own Mobius wrap, I found a pretty pattern for a Starry Night Shrug from Lincraft. Click on the "printable pattern" for a pdf file and a really cute picture!

Friday, August 1, 2008

Faux Fur


I was watching "The Thin Man" again the other day and they showed a brief, but beautiful photo-biography of Myrna Loy, the "Queen of Hollywood." I scoured the net looking for a particular picture that they showed, but couldn't find it. The one I saw was of her wearing a coat with a huge fur collar - one that goes down the front of the coat as well. It was big and fluffy and obviously real fur of some sort.


I came across a few examples, though none of these are exactly what I had in mind. I have some loopy Italian mohair yarn in dark rust that I've had set-aside, waiting for inspiration. Well, I think I've found it. I'm picturing a coat with a big furry collar. I'm not sure yet if it should be detachable, or worked directly onto the sweater. I like the short coat with big buttons too.

I love finding inspiration from movies and vintage fashions. While there are many gorgeous movie stars, there are a few that I find fascinating. Katherine and Audrey Hepburn, Ingrid Bergman, Lauren Bacall, and Greta Garbo - to name a few. Perhaps I was born in the wrong era? I think I'll work on some hats while I'm at it. And I'd love to hear who or what inspires you!

Sunday, February 24, 2008

Powerpuff Madness


What's gotten into me? I don't know. Just a crazy kick I guess.
As promised, here's the next hat in my Powerpuff Tribute...... Bubbles' Cloche!


Friday, August 31, 2007

A Quiet House

I missed having the house to myself! I love how quiet it can be. It brings back memories of visiting my grandparents. They had a daily routine and, around late-morning, it was wonderfully quiet and peaceful at their house. You could hear the cuckoo clock ticking away. It didn't occur to me then how they enjoyed their peaceful days.


Although, there are times when I blast the stereo too! Lately I've been enjoying listening to a local commercial-free alternative rock station 88.9 WSTB. The kids come home from school and ask if they can turn it down! LOL


So, it doesn't really matter whether I opt for a quiet day or a loud one, I still have been loving my time alone. Back-to-school time allows me to get caught up on projects I've set aside, organize supplies, and plan for the busy Fall/Holiday season.

Here are a few Back-to-School fashions available in my Etsy shop. New designs and lots more to come!

AddThis